Perfect Tofu

Of course on the same day I blogged about not having any good recipe ideas, I came up with what I’d like to think is a pretty decent tofu marinade. I know a lot of people aren’t tofu fans, but as a vegetarian, the big ‘ole block of soy is a really versatile way for me to get some extra protein. As long as you have a good marinade and cook it properly, I think it can be really delicious. Up until this point, my favorite was this Spicy Peanut Baked Tofu, which is easy, but not extremely versatile. I’ve never really used tofu outside of stir-fry styled dishes or egg replacements, but I’ve seen plenty of seasoned and marinated tofu “steaks” in stores, so I figured I would try my own.

One thing I’ve noticed in most vegetarian recipes that attempt to be meat replacements, is the use of soy sauce. So, I went to my pantry, grabbed a whole bunch of spices that I thought would go well together and soy sauce, and got mixing. This can be thrown together in a matter of minutes, and the beauty of a marinade is that the longer it sits, the better it winds up tasting. I served these tofu “steaks” with some brown rice, black beans, and salsa. I think it would probably be equally as delicious on a baguette with sautéed onions and peppers… I’ll definitely be trying that next!
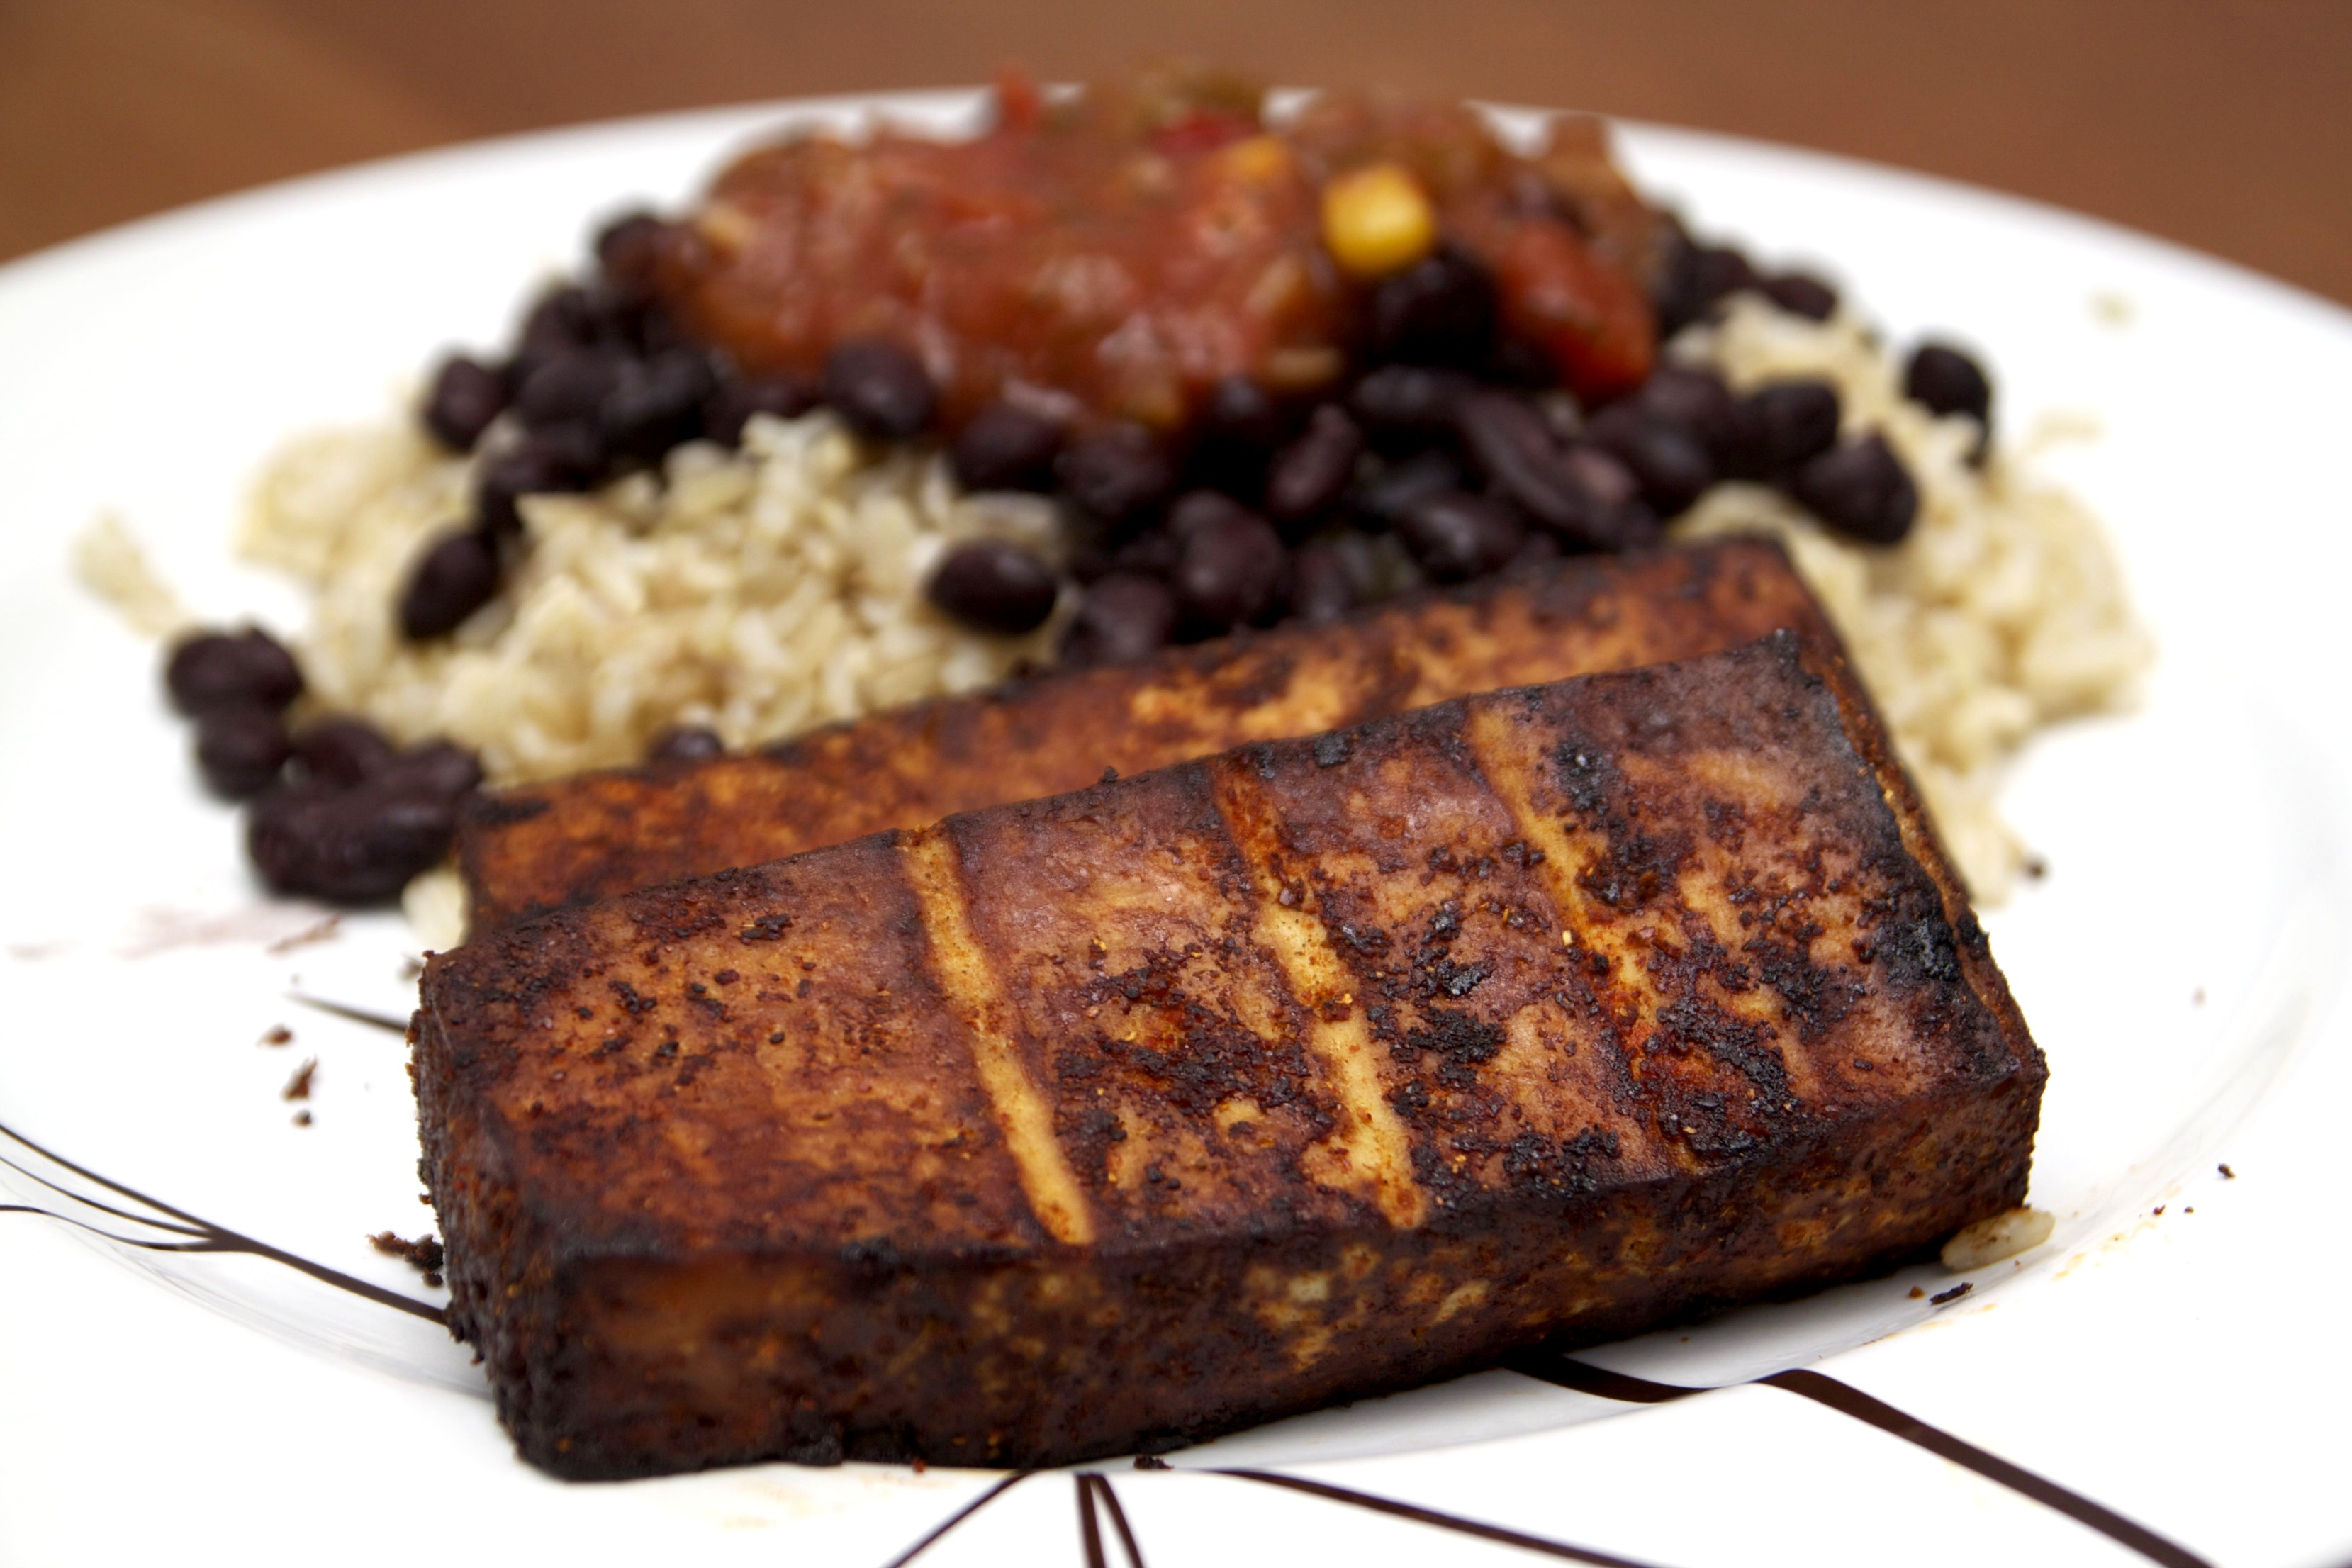
TofuSteak2

Baked Tofu Steaks
– Serves 2 –

Ingredients:
1 package extra firm tofu
1/4 cup soy sauce
1 Tbsp liquid smoke
1 tsp chili powder
1 tsp garlic powder
1 tsp curry powder
1/4 tsp cayenne

Directions:
1. Preheat oven to 350 degrees.
2. Press the excess water out of the tofu (for at least 10 minutes). If you don’t have a tofu press, a big cookbook with the tofu between two plates will work – just make sure you have a towel under it! 
3. In a bowl, mix together all of the marinade ingredients (soy sauce, liquid smoke, and spices) and pour into a shallow baking dish or tupperware container.
4. Slice the tofu in half long-ways, and then in half again so you have 4 rectangular pieces.
5. Place the tofu in a single layer in the baking dish with the marinade, and let sit for 15 minutes. After 15 minutes flip to the other side, and allow it to sit for an additional 15 minutes.
6. Place the tofu on a greased baking sheet and bake for 30 minutes, flipping half way through.
7. Serve with rice and beans for a Southwestern flare, enjoy on a baguette, or by itself!

Veggie-tastic

This past Friday (February 8th) marked my 6th month as an official vegetarian!

Becoming a vegetarian is something that I had been interested in for a long time, but never committed to for one reason or another. So after months of generally eating meat-free, I decided to finally take the plunge in August, and I haven’t looked back. Sure, I’ve made a few mistakes here and there (dipping a chip into an unassuming dip at a party only to find out there’s shredded chicken in it), and I haven’t inquired in great detail while out at restaurants (is the meat-free pasta dish truly vegetarian?), but I’d say that overall the last 6 months have been a success.

I thought I would share with you what has helped me in the journey, in case some of you are toying with the idea of becoming vegetarian, but feel like they don’t have enough resources to be successful in your attempt. Or, if you’re just looking for more ways to incorporate a meat-free diet into your life (even if not all the time)! I’d be lying to you if I said it’s easy; sometimes I just want a hamburger, and I often get questioned and teased by friends and family, but at the end of the day, I know that I’m making the right decision for myself. And at the end of the day, that’s what is most important! So here are a few different things that have really helped me.

Vegetarian/Vegan blogs, with tons of delicious recipes (just to name a few):

Vegetarian/Vegan Cookbooks:

  • Appetite for Reduction by Isa Chandra Moskowitz
  • Plenty by Yotam Ottolenghi
  • The Conscious Cook by Tal Ronnen
  • Vegan Fire & Spice by Robin Robertson
  • The Meat Lover’s Meatless Cookbook by Kim O’Donnel
  • Student’s Vegetarian Cookbook by Carole Raymond

All of the above blogs and cookbooks have either vegetarian or vegan recipes (some a mix, some just one). I’ve made plenty of vegan meals despite being a vegetarian. But I’ve also made plenty of vegan recipes and easily turned them into vegetarian (usually just by adding cheese). Most of them are also easily adaptable to other dietary restrictions (gluten free, etc.).

Pantry Staples:

  • Grains: quinoa, cous cous, farro, brown rice, lentils
  • Meat substitutes: Tempeh, tofu, soy chorizo, TVP (textured vegetable soy protein)
  • Beans and protein: pretty much any and all bean types, eggs, Greek yogurt
  • Condiments/extras: almond butter, peanut butter, nutritional yeast, lots of spices
  • Vegetables! Fruits! Milk and cheese!

Quick Fixes:

  • LightLife refrigerated and frozen meals
  • Amy’s Kitchen frozen meals and soups
  • Frozen veggie burgers (what can I say, I’m a sucker for them. Though I do love homemade!)

Obviously the above isn’t an extensive list, but just the basic things that have really helped me over the last 6 months. There are tons of resources for vegetarians and vegans (tons of blogs, websites, magazines, etc.), and while nothing will completely replace the taste of meat, there are plenty of foods and recipes that will help you not miss it so much. And I know for a lot of people, the above information is not new. But I can’t tell you how many people don’t truly know what vegetarians eat (yes, we eat more than lettuce!).

Do you have any other suggestions for resources I should check out (food brands, recipes, blogs)?
Are you a vegetarian? Ever gave it a try, or thinking about it? 

Another Week

It’s been a week since superstorm Sandy touched down in the greater tri-state area and wreaked havoc. A week of working from home, running as much as possible, and trying to keep up with the news while simultaneously trying to keep my tears at bay. It’s hard to believe that places I grew up and know so well have been forever changed; and more importantly than that, the friends and family that have had their lives changed as well. As I mentioned last week, I was lucky enough to retain power through the storm and not to suffer any damages myself. My office, as well as my parents, however, haven’t had power since late Sunday, with reports of it not coming back until the end of this week. While it’s easy to get angry at a lack of heat and power, in the grand scheme of things, it could be much worse.

That being said, even though our oven isn’t working, I’ve been cooking up a storm. My most recent creation was vegan buffalo lasagna. All my GI woes have gotten a little better, and while going gluten-free didn’t seem to make a difference, my doctor has suggested I lay low on dairy. I’m still eating dairy, just a lot less. At my last appointment when trying to figure out why I wasn’t getting much better, I just so happened to mention that I loved cheese, and I watched my doctor immediately scribble that information on his legal pad, with exclamation points to follow the statement. Things have been going better, but I’ve also upped my medicine, so we’ll see what happens when I start to dial the medicine back. So, to cater to my new reduced dairy diet and vegetarianism, this particular recipe is dairy and meat free! You can use regular cheese and dressing (and of course add in chicken), but you should give this version a try!

Vegan Buffalo Lasagna
– Serves 4 –  

Ingredients:
1 block firm tofu
2 Tbsp nutritional yeast
1 cup Frank’s red hot
1 cup vegan Ranch dressing (i.e. Follow Your Heart)
8 oz. vegan shredded mozzarella cheese (i.e. Daiya)
9 “no boil” lasagna noodles

Directions:
1. Press the tofu to get out as much water as possible.
2. Meanwhile, combine the Frank’s and ranch dressing together in a bowl.
3. In a separate large bowl, break up the tofu using a fork until it resembles ricotta cheese.
4. Add in the nutritional yeast and 1/2 cup of the dressing mixture, stirring to combine.
5. Take 4-6 tbsp of the dressing mixture to generously coat the bottom of your slow cooker.
6. Layer 3 no boil noodles, followed by 1/3 cup of the tofu mixture, and a 1/4 cup of the mozzarella cheese. Repeat.
7. After adding the last 3 noodles, pour the remainder of the dressing mixture, being sure to coat everything. Top with the remaining cheese.
8. Cook on high in the slow cooker for 2 hours.

Modifications

On Monday, I stayed home from work like almost everyone in the Northeast due to Sandy. Even though I was working from home, I made sure to make dinner early (I’m talking before noon) just in case the power went out as the storm approached later in the day (the oven is electric). I had Namely Marley’s Lentil Sloppy Joe’s on the menu, and since there were purple turnips in our Fresh Box, I thought I’d roast them as a side dish. I was able to make the sloppy joe’s no problem, so a few hours later I turned on the oven so it could pre-heat for the turnips.

Almost immediately I heard a crackling that sounded like something was burning. To my horror I looked through the oven’s window and saw bright white light… the makings of a fire. I immediately turned off the oven and blew out the flames, and stared in disbelief. Of course I was immediately annoyed that my oven would have the nerve to break during a storm, and wasn’t sure what to make instead. Since I love when my mom makes mashed turnips for Thanksgiving, I figured I’d attempt to put my own spin on them. This version is vegan, but it would be just as good with regular milk!

I can’t have a post about a recipe I made during Sandy without speaking of the storm itself. Thankfully, my townhouse kept power during the entire storm (though it did come and go a few times). It seemed like everyone around me (including my parents) lost power, and are still in the dark. I’m surrounded by the Raritan River, but thankfully am a little higher up. So, while everything around me seems to flood and lose power often, this is the third major storm I’ve weathered here and have made it out okay. Though, being surrounded by such damage means I can’t really get anywhere – but I’m okay with that. I’m keeping everyone in my thoughts and prayers, and sending a big thank you to everyone keeping us safe (police, fire fighters, nurses, doctors, EMT, etc.)!

But back the turnips. If you’re not a coconut fan, you can definitely use some EarthBalance (or if you aren’t vegan, regular butter). The coconut adds some extra flavor notes that I enjoyed, but I know of plenty of people who are not coconut fans, so butter will work just fine!

Vegan Mashed Turnips
– makes 3 cups –

Ingredients:
3 turnips, cubed
2 tsp coconut oil
1-2 Tbsp almond/soy/coconut milk (I used unsweetend)
1/4 tsp garlic powder
1/4 tsp paprika
Salt & pepper to taste

Directions:
1. Boil the cubed turnips for about 25 minutes, or until they are tender and can easily be pierced with a fork. 
2. Drain the turnips and return them to the pot. Add in the coconut oil, milk of choice, and spices. Using a manual masher (I have a great double masher from Crate & Barrel) or hand mixer on low, mix everything together to your preferred consistency  (I like to leave a little chunk). 

Shake It

If you remember not too long ago the folks at Vega sent me some of their newly launched Vega Smoothies to try. I loved the individual packets and their convenience, so when they asked if I’d be interested in trying their new Vega One French Vanilla flavor, I couldn’t resist.

It’s true that nowadays I’m a bit of a nutrient powder fiend. Since getting a bunch to try from GNC (final thoughts coming soon!), I’ve been having some type of protein powder in one form or another almost every day. This isn’t to say I am getting most of my nutrients from powders (that would be weird, and I probably wouldn’t be very healthy), but I like the ability to add to my daily intake when necessary – especially during marathon training. Since all of the powders I have are protein based, I was excited to try something that was a little more well-rounded, even if the protein count is on the lower side. These powders have 50% of your daily intake of vitamins and minerals, 15 grams of protein, 6 grams of fiber, 1.5 grams of Omega-3, and a bunch of antioxidants, probiotics, and greens.

When it comes to shake and powder flavors, chocolate and vanilla are usually the most popular (and most people I know gravitate towards chocolate). I remember when I was younger stopping at a Friendly’s with my mom and getting milkshakes; she ordered chocolate and I ordered vanilla. I’m never going to forget her commenting about how boring it was that I ordered vanilla, and if I was going to have a shake I should have gotten chocolate (since it’s apparently much less of a boring flavor). While I love chocolate, I still to this day find myself gravitating towards vanilla flavored drinks, and so I was pumped to try Vega’s French Vanilla.

I know a lot of people try different kinds of vanilla powders and say things like “Wow! That tasted like cake batter!,” well I’m here to tell you that if you’re looking for a cake batter or super sweet flavor, this powder isn’t for you. It’s plant based and is derived from ingredients like pea protein, so it tastes much more earthy than your average instant smoothie. This isn’t to say it’s bad – I just think it is much more of an acquired taste than most would be prepared for. I’ve found that mixing it with some type of milk (regular milk, or almond/coconut/soy/hemp) is much better than just using water – the powder mixes much better with a thicker milk consistency, and the flavors meld together in a way that isn’t possible with water. Also be aware – since it’s derived from plants, when mixed it does have a greenish hue. For me, I’m not looking for a dessert flavored healthy shake – if I wanted a milkshake tasting drink, well, I’d have myself a milkshake!

That being said, I like how convenient it is; mixing some into some milk gives me way more nutrients than I would get from your average smoothie, and its filling! I prefer to have it in the early afternoon just when I’m about to hit the slump, or in the morning as a part of my breakfast.

It turns out they’re having a sale and offering 15% off until 9/30/12! So if you’re interested in giving it a try, head over to Vega.com and order yourself some!

Do you use any powders to enhance your daily nutrients? 

Disclaimer: Vega sent me these protein powders to try at no cost to me, and all opinions are my own. 

Transition Chili

I always find myself with mixed emotions when summer comes to a close. It’s no secret that summer is my favorite season (it’s always been), but I don’t mind fall. In fact, there are a lot of things I do enjoy about fall, like cooler running temperatures, being able to wear boots and scarves, not working up a sweat while cooking, and Halloween!

I’m looking forward to this fall because it means I get to relax – at least a little. This summer has been packed with marathon training (even if it’s been half-hearted, it still takes up a lot of time!), and a LOT of weddings. Basically, I’m looking forward to not having to wake up at the crack of dawn to run because it’s too hot and I have a million things planned for the afternoon. Yes, I can’t wait to be lazy.

Aside from cooler temperatures and new fashion, there are foods that evoke the feelings of different seasons, too. One food that makes me think of cooler weather is chili (and soups in general). Even though it’s still technically summer (I can’t handle people saying things like, “it’s officially fall!” because it in fact, is not until tomorrow), I decided to deviate a bit from my “hang on to summer for as long as possible” mantra and made a pot of chili. For me, this wasn’t just any old batch of chili, though, rather it was more of a transition from summer to fall because of the ingredients – they’re light and colorful, but still provide that quintessential big bowl of chili feeling.

Veggie Grain Chili
– serves 4-6 –  

Ingredients:
1 Tbsp olive oil
1 yellow onion, diced
1 poblano pepper, diced
1 Tbsp chili powder
1 Tbsp cumin
1 tsp Adobo
1 tsp oregano
1 6 oz. can tomato paste
2 15 0z. cans of beans – I used black and pinto, but any combo will work! 
4 oz. soy chorizo (or regular chorizo)
1 sweet potato, peeled and diced (smaller pieces help it cook faster)
1 ear of corn (kernels removed)
18 oz. vegetable broth (about 1.5 cans)
1 cup dry cous cous or quinoa

Directions:
1. In a large soup pot, heat the oil over medium-high heat. Sauté onions and poblano pepper for for 5-10 minutes, until they’re translucent. 
2. Add in the spices (chili powder, cumin, Adobo, oregano), and tomato paste. Stir constantly, cook for an additional 2-3 minutes. 
3. Stir in beans, soy chorizo, sweet potato, corn, and vegetable broth. Turn heat down to medium, and cook for 5 minutes. 
4. Add in the grain, and cook for an additional 10-15 minutes, stirring every few minutes. 
5. Serve with avocado, cilantro, cheese, and/or sour cream! 

Lunch Toppers

When it comes to cooking, it’s easy to fall into a pattern. For me, I like to try and make something new almost every night for dinner. But when it comes to lunch, I tend to stick to what I know and repeat a lot. What I have for lunch seems to go through a cycle, depending on what I’m feeling. One week it may be frozen meals, another week it may be sandwiches, and sometimes its specific snacks or ingredients.

I’ve been adding cucumbers and tomatoes to my lunches almost everyday the past two weeks thanks to my CSA box, putting them in sandwiches, wraps, and salads. My favorite, though, has to be in sandwich form with some hummus and alfalfa sprouts. It’s simple, easy, and really delicious. The cucumbers add a nice crunch, while the tomatoes add some sweetness.

I think it’s important to eat what you enjoy at lunch – it’s a break in the workday, and who wants to eat something they’re less than enthusiastic about? There are plenty of afternoons I head to the kitchen ready for lunch, and am less than excited about what awaits in the fridge. My personal favorites are a well dressed sandwich or salad, or leftovers. Since I save most of my eating out for dinner on the weekends, I only have myself to blame when I’m less than excited about what I have each day. I can’t wait to see what my next lunch obsession is… I’m seeing veggie burgers in my future.

Do you have any lunch time staples? 
Any suggestions of things I should definitely try? 

Weeds for Dinner

“Dandelions are weeds.” I’m sure that’s something everyone has heard – I remember being told that dandelions were not the cute little flowers I thought they were, but rather are pesky weeds that needed to be removed. I still continued to pick the dandelions whenever I saw them, pretending they were in fact flowers (like the everyman’s flower) even though I couldn’t shake the thought that they were just a simple garden weed. Since weeds grow rapidly and usually in places you don’t want them to (like my entire front patio), they have a bad reputation. Little did I know, though, some weeds are not only delicious, but also super charged with nutrients!

I’m not saying you should go into your backyard, pick out all your weeds, and then sauté them for dinner. I am, however, saying that dandelion greens are more than just the weeds attached to that pesky little flower – they’re a delicious herb that can be used in a ton of recipes.

This weeks’ CSA box came with a bunch of dandelion greens, and while I was intimidated, I knew right away what I’d do with them. After sampling a leaf to see how it tasted raw, it was clear sautéing was the obvious way to go. They taste like bitter spinach, but if you sauté it enough and add in some garlic and other spices, you’re golden. I mixed it with chickpeas and threw it over pasta, giving me a quick and easy meal! Since I’m still trying to be mostly gluten-free (the complete elimination did nothing, so I’m just trying to limit typical trigger foods – gluten and dairy), I used corn pasta with this recipe. Of course, you can use regular pasta (any shape will do), or another grain like quinoa.

Dandelion and Chickpea Sauté
– Serves 2 –

Ingredients:
2 Tbsp olive oil
1 15 oz. can of chickpeas, drained and rinsed
1 bunch of dandelion greens, stems removed and roughly chopped (you’ll get about 4 cups)
2 garlic cloves, minced
1 tsp red pepper flakes (you can use more or less depending on your heat preference) 
1 tsp oregano
1 tsp dried basil
Parmesan or Nutritional Yeast for a little cheesy taste, if you’d like 

Directions:
1. In a medium sauté pan, heat the olive oil over medium-high heat.
2. Add the garlic and cook for about 2 minutes. Add the dandelion greens and sauté until wilted, about 5 minutes.
3. Add in the chickpeas, red pepper flakes, basil, and oregano; lower the heat and sauté for an additional 5 minutes. 
5. Serve over pasta or your favorite grain – and feel free to add some shredded or grated cheese, or nutritional yeast! 

Peachy Keen

There’s no other way to say it: I made peach salsa on Sunday and it was awesome. Using ingredients from my fresh box, I threw together a flavorful peach salsa that took a total of 10 minutes to prepare. The great thing about salsas like this, is that the longer they sit around, the better they taste.

While this is the case for salsa, the same principle cannot be said for my running. On Sunday I had 12 miles scheduled. The temperature was deceptively cool; I figured it would be easy to get through and I’d be ready to really up my mileage this week. I’ve been struggling trying to slow myself down on my long runs, so my goal was to stay within the 9 minute mile pace – I didn’t care if it was 9:01 or 9:59, I just wanted to be slower than 8, but faster than 10. Because it rained so much the day before, the tow path alongside the Raritan River was super muggy which made the run much harder than it seemed at the time. By the time I finished 7 miles and was back in the park, I was dripping with sweat and had to stop at a water fountain (I mean soaked to the point where the brim of my hat was dripping!). The next three miles were not so fun.

I got through another 3.5 miles, but called it quits at 10.5. I knew I needed to get my 12 for the day, so 5 hours later after preparing the oh-so-delicious salsa, I set back out for another light jog. It was misting and looked like it could downpour at any moment, but I managed to get through 2.5 miles with an 8:05 average to round myself out to 13 miles for the day. It’s nice to know that only a few hours after a run I struggled through, I was able to not only run again, but do it in a somewhat fast manner. And, I saw two rainbows on the run!

But back to the salsa. I decided to use the salsa as a topping for some simple grilled salmon. I didn’t season the salmon at all – I threw it on the grill for about 10 minutes on medium-high heat (about 5 minutes on each side) and the salsa provided the rest of the flavor. Paired with some grilled corn on the cob and mashed potatoes, this meal was a serious winner.

The recipe is really easy and straight forward, and it’ll last you a few days. As long as it’s stored in an air-tight container, you can keep it refrigerated for about a week… if it lasts you that long!

Spicy Peach Salsa
Makes about 3-4 cups – 

Ingredients:
3 large tomatoes
2 large peaches
1 jalapeño (deseed it if you don’t want it spicy)
1/2 medium white onion
1/4 cup cilantro
Juice from one lemon

Directions:
1. Dice tomatoes, peaches, jalapeño, onion, and cilantro and combine in a medium sized bowl. 
2. Squeeze the lemon juice and mix to combine. Refrigerate for at least 30 minutes – but the longer, the better!  

Crabby Patty

With a lot going on in my life recently, I’ve come to realize that I haven’t been the most pleasant to be around (heck, sometimes I haven’t even wanted to be around myself). Let’s be honest, no one likes a crabby person, and I’ve definitely been one over the last few weeks. I’ve had a few procedures in the past few weeks with still no answers, so that combined with a screwed up schedule from all the tests, and my inability to eat and exercise normally has resulted in a crabby Danielle.

Look at that crabby patty!

I’ve spent most of the last week and a half in what I like to refer to as “a ball of mean.” Thankfully, I’ve been aware of my mood, so I’ve just kept to myself. My mood has improved now that I’m back to a more normal routine, including cooking! Spending time in the kitchen can be hit or miss for me – it’s either really great and helps relieve stress, or it just adds to it. For awhile it’s been more of a burden than a pleasure, but that seems to thankfully be turning around. So, on one of the “better” nights I decided to throw together a polenta bake.

Despite not getting the official “ok” from my doctor, after consulting with nurse mom, we decided I could reintroduce some dairy, as not having it has made no change over the last few weeks. So I’m still limiting myself, but not completely avoiding it. After next week’s final test, we should have a pretty good idea of what’s going on down below. But until then I’m going to make things like this delicious vegan bake that can easily be turned vegetarian or even enjoyed by a meat lover. Make sure to choose your hot pepper wisely, though – this can get spicy quickly!

Vegan Southwestern Polenta Bake
– Serves 4 –

Ingredients:
4 Tbsp oil for cooking
1 package of soy crumbles, about 1 1/2 cups of TVP, or 1 lb of ground turkey/beef
4 oz. cream cheese or cream cheese substitute (I love Trader Joe’s “Not Cream Cheese”)
1 medium yellow onion, diced
1 hot pepper of your choice, diced (I used a dried habanero and it was HOT!)
1 (150z) can black beans, drained and rinsed
1 package/tube of pre-cooked polenta (again, a big fan of TJ’s)
2 Tbsp nutritional yeast
2 Tbsp chili powder
1 tsp cumin
1 tsp Adobo
1 cup of salsa
Avocado for garnish

Directions:
1. Preheat oven to 375 degrees
2. In a small pan, sauté onion in 2 tbsp of oil over medium-high heat until translucent, 5-10 minutes. Set aside.   
3. In large skillet, cook your meat/meat substitute about 5 minutes over medium-high heat. Add in cream cheese until melted, as well as spices and cook for an additional 2 minutes. Add in cooked onion, beans, and hot pepper. Cook till heated through and combined, about another 2 minutes. Stir in nutritional yeast.  
4. Slice the polenta into 1/2 inch rounds, and layer in a 9×11 sprayed baking dish.
5. Top the polenta with the meat/bean mixture, and top with salsa
6. Bake 20 minutes or until salsa is bubbling.
Serve with sliced or mashed avocado.